
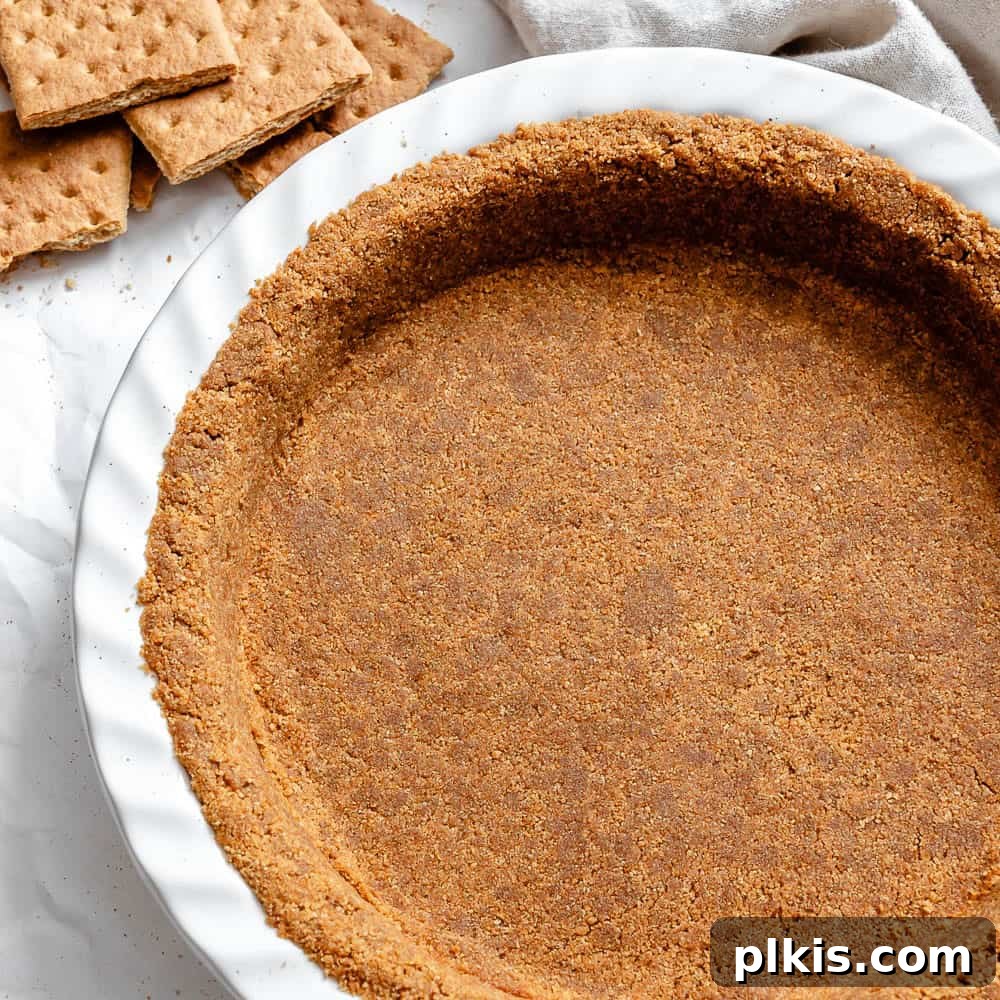
Discover how to create the most decadent and ‘buttery’ homemade vegan graham cracker crust in just 15 minutes. This simple, flavorful crust is a game-changer for plant-based pies, cheesecakes, and tarts, offering a superior taste and texture that store-bought options simply can’t match. Elevate your dessert creations with this easy-to-follow recipe that promises a perfectly firm yet tender base every time.

Why You’ll Love This Homemade Graham Cracker Crust Recipe
Forget the days of bland, crumbly, or overly sweet store-bought pie crusts. This homemade vegan graham cracker crust is a revelation, designed to be not only incredibly easy but also packed with flavor and a delightful texture. Here’s why it will become your go-to crust recipe:
- Unbeatable Flavor and Texture: Unlike pre-made crusts that often taste stale or artificial, this recipe delivers a rich, ‘buttery’ (thanks to vegan butter!), and perfectly crunchy base. The fresh graham cracker flavor truly shines through.
- Effortlessly Quick: With only about 15 minutes of active preparation time, this crust comes together faster than most traditional pastry crusts. No extensive rolling, chilling, or blind baking required, making it perfect for busy schedules or last-minute dessert cravings.
- Simple, Wholesome Ingredients: You only need a few basic ingredients: vegan graham crackers and vegan butter. There are no unnecessary additives, corn syrup, or preservatives often found in commercial crusts. You control exactly what goes into your dessert.
- Incredibly Versatile: Whether you’re planning a baked cheesecake, a no-bake fruit tart, or a creamy chocolate pie, this crust adapts beautifully. It holds its shape remarkably well for both baked and unbaked applications, offering a sturdy foundation for any filling.
- Dietary-Friendly: Being entirely plant-based, it’s suitable for vegans and those with dairy allergies or intolerances, ensuring everyone can enjoy a slice of your delicious desserts.
- Cost-Effective: Making your own crust is often more economical than buying pre-made ones, especially when you consider the superior quality and taste you achieve at home.
- Make-Ahead Convenience: Prepare the crust in advance and store it in the fridge or freezer, making holiday baking or party preparation a breeze.
In this comprehensive guide, I’ll walk you through my perfected method for creating the BEST vegan graham cracker crust, including clever tips for customization and troubleshooting, ensuring your desserts are always a resounding success.
Essential Ingredients for Your Vegan Graham Cracker Crust
Creating an exceptional graham cracker crust requires only two primary ingredients, with a few optional additions to enhance flavor. Choosing high-quality ingredients is key to achieving the best results.

Key Ingredients:
- Vegan Graham Crackers: The star of our crust! Ensure you choose a brand that is certified vegan. Many common brands are accidentally vegan, but always double-check the ingredient label for honey, dairy, or other animal products. You’ll need approximately 13 whole graham cracker sheets, which typically yield about 1 ½ cups of fine crumbs. If your crackers are a bit softer, you might need slightly more to get the right crumb-to-butter ratio.
- Vegan Butter (Melted): This is what binds the crumbs together and imparts that signature rich, ‘buttery’ flavor. Earth Balance is a widely available and excellent choice for vegan butter. Melt it gently and ensure it’s completely liquid before mixing. The amount needed can sometimes vary slightly depending on the dryness of your graham cracker crumbs, so keep a little extra on hand.
Optional Flavor Boosters:
- Granulated Sugar or Brown Sugar: While graham crackers are sweet on their own, a tablespoon or two of added sugar can enhance the sweetness and caramelization, especially if you’re baking the crust. Brown sugar adds a deeper, molasses-like flavor.
- A Pinch of Salt: A tiny bit of salt (¼ to ½ teaspoon) can beautifully balance the sweetness and bring out the flavors of the crackers and butter. It’s often the secret ingredient that makes desserts truly pop!
- Ground Cinnamon or Other Spices: For an extra layer of warmth and complexity, consider adding ½ to 1 teaspoon of ground cinnamon, nutmeg, or even a pumpkin pie spice blend. This is particularly delicious for apple pies, pumpkin pies, or cheesecakes.
By understanding these simple ingredients and their roles, you’re well on your way to crafting a perfect homemade vegan graham cracker crust that will impress everyone.
Step-by-Step Guide: Crafting Your Perfect Graham Cracker Crust
Creating this rich and versatile graham cracker crust is surprisingly simple. Follow these steps for a foolproof result every time, whether you’re a seasoned baker or new to the kitchen.


Step 1: Crush Your Graham Crackers into Fine Crumbs
The first crucial step is to achieve a consistent, fine crumb texture. You have two main options for this:
- Food Processor Method: This is the quickest and easiest way. Place your whole graham cracker sheets into a food processor. Pulse several times until they break down into fine, even crumbs. Avoid over-processing, which can turn them into a paste. The goal is a texture resembling fine sand.
- Ziplock Bag & Rolling Pin Method: If you don’t have a food processor, this manual method works just as well. Place the graham crackers in a sturdy Ziplock bag, seal it (removing excess air), and then use a rolling pin or the bottom of a heavy glass to crush them. Apply even pressure and continue crushing until you have fine crumbs. This method can be a bit more satisfying and ensures you have full control over the crumb size.
Once crushed, transfer the fine crumbs to a medium-sized mixing bowl. If you’re adding optional sugar or spices, now is the time to whisk them into the crumbs to ensure they’re evenly distributed.
Step 2: Combine Crumbs with Melted Vegan Butter
Gently melt your vegan butter (either in a microwave-safe bowl or a small saucepan over low heat) until it’s completely liquid. Pour the melted vegan butter directly over the graham cracker crumbs in your mixing bowl. Using a spatula or your hands, mix thoroughly until all the crumbs are evenly coated. The mixture should resemble wet sand – moist enough to hold its shape when squeezed, but not greasy or overly wet. This ensures a firm, yet tender crust.
Step 3: Press the Mixture into Your Pie Pan
Pour the ‘buttery’ graham cracker mixture into your chosen 9-inch pie pan (or springform pan, tart pan, or even mini molds). Distribute the crumbs evenly across the bottom of the dish. Now, it’s time to compact the crust:
- For the Bottom: Use the bottom of a flat-bottomed glass, a measuring cup, or a tart tamper to firmly press the crumbs into an even layer across the entire base of the pan. Apply firm, consistent pressure.
- For the Sides: Once the bottom is compacted, use your fingers or the side of the glass to press the remaining mixture up the sides of the pan. Work your way around, ensuring the sides are also firm and even. A trick is to use your thumb to hold the bottom edge while pressing the side up with your fingers. This creates a neat, sturdy edge.
The key here is to pack the crust firmly enough so it holds together, but avoid overpacking, which can lead to a hard, dense, and difficult-to-cut crust.
For a No-Bake Graham Cracker Crust: If your recipe calls for a no-bake crust, transfer the pressed crust to the freezer for 10-20 minutes, or the fridge for 30-45 minutes. This chilling time allows the vegan butter to solidify, setting the crust firmly before you add your filling. Once set, it’s ready to be filled with your favorite no-bake cheesecake, pie, or tart mixture.
For a Baked Graham Cracker Crust: If your recipe requires a baked crust (which adds a delightful crispness and deeper flavor), preheat your oven to 350°F (175°C). Place the pie pan with the crust in the preheated oven and bake for 10-12 minutes, or until the edges are lightly golden brown and the crust smells fragrant. Remove from the oven and allow it to cool completely on a wire rack before adding any filling. Cooling is essential to prevent a soggy crust.
Frequently Asked Questions About Graham Cracker Crust
Not at all! This versatile graham cracker crust recipe is designed to work beautifully for both baked and unbaked recipes. For no-bake desserts like raw cheesecakes or creamy pies, simply chill the pressed crust in the fridge or freezer until firm. Baking the crust, however, adds a lovely toasted flavor and a slightly crisper texture, which can be preferable for some recipes.
Absolutely! This recipe is incredibly adaptable. You can create delicious alternative vegan crusts using a variety of cookies or crackers. Here are some popular options and considerations:
- Gingersnaps: Offer a spicy, warming flavor, perfect for fall or holiday pies.
- Vegan Oreos: For a rich chocolate crust, use vegan-friendly sandwich cookies (many Oreos are accidentally vegan, but check labels). Crush them with the filling for extra richness. A general ratio to start with is 3:1 vegan cookie crumbs to melted vegan butter by weight, but you may need to adjust as cookies absorb butter differently.
- Biscoff Cookies: Provide a delightful spiced caramel flavor, excellent for speculoos cheesecakes or coffee-flavored desserts.
- Ritz Crackers (Vegan variety): For a saltier, savory-sweet crust, these work well, particularly with fruit tarts where a contrast is desired. Note that the vegan cookie-to-butter ratio will likely vary significantly due to their different fat and moisture content.
- Vegan Vanilla Wafers or Shortbread Cookies: For a classic, buttery vanilla flavor that complements almost any filling.
Always remember that the butter ratio may need slight adjustments based on the type and dryness of the cookie/cracker you choose. Start with the recommended amount and add more melted butter, a tablespoon at a time, until the mixture resembles wet sand.
This recipe is designed to yield enough crust for a standard 9-inch pie dish or springform pan, covering both the bottom and sides. However, its versatility allows for other pan sizes:
- 8-inch Pan: If using an 8-inch pan, your crust will be slightly thicker.
- 10-inch Pan: For a 10-inch pan, the crust will be a bit thinner, or you might choose to only press it onto the bottom, omitting the sides.
- Square Pan: Perfect for dessert bars (like cheesecake bars or lemon bars), you can press the mixture onto just the bottom of an 8×8 or 9×9-inch square pan.
- Mini Molds: The mixture is also ideal for individual mini vegan cheesecakes or tarts. The crust thickness will naturally vary based on the mold size.
The key is to adjust the crust thickness to your preference and the specific requirements of your dessert. You can always slightly scale the recipe up or down if you need more or less volume.
Yes, absolutely! While graham crackers have their own sweetness, you can certainly enhance the flavor. Adding 1-2 tablespoons of granulated sugar or brown sugar can provide extra sweetness and help with caramelization if baking. For spices, ½ to 1 teaspoon of ground cinnamon is a classic addition, but you could also try nutmeg, ginger, or a pumpkin pie spice blend, depending on the filling you plan to use. Mix these in with the dry crumbs before adding the melted butter.
Making this crust gluten-free is very simple! Just substitute regular graham crackers with gluten-free graham crackers. The process and butter ratio remain the same. Ensure all other ingredients, like vegan butter, are also certified gluten-free if cross-contamination is a concern for severe allergies.
If your crust is too crumbly, it likely needs more melted vegan butter. Add it one tablespoon at a time, mixing well, until the crumbs hold together when pressed. If your crust is too hard or dense, it might be due to overpacking. While firm pressing is good, excessive force can compact the crumbs too much. It could also be slightly overbaked if you chose to bake it. Ensure you press firmly but gently and bake only until lightly golden.
Pro Recipe Tips for the Best Graham Cracker Crust
Achieving a consistently perfect graham cracker crust is easy with a few expert tips. These insights will help you avoid common pitfalls and ensure your crust is always a success:
- Cracker Amount May Vary: Be aware that graham cracker sizes and weights can differ between brands, and some may even seem to shrink over time! Always measure your crumbs (aim for 1 ½ cups) rather than relying solely on the number of whole crackers. You may need an extra cracker or two to hit the right volume.
- Crush the Crackers Finely and Evenly: The key to a smooth, cohesive crust is uniformly fine crumbs. Any large chunks can make the crust uneven, prone to crumbling, and difficult to slice cleanly. Use a food processor for the best consistency, or ensure thorough crushing with a rolling pin.
- Achieve the “Wet Sand” Consistency: When mixing the melted vegan butter with the crumbs, aim for a texture that resembles wet sand. It should clump together easily when squeezed in your hand but not be greasy or dripping with butter. This indicates proper saturation for binding. If it’s too dry, add a little more melted butter, a teaspoon at a time.
- Pack the Crust Firmly, But Don’t Overpack: A compact crust is essential for it to hold its shape, especially when slicing. Use a flat-bottomed glass or measuring cup to press the crumbs down firmly. However, avoid excessive force, as overpacking can result in a hard, dense crust that’s difficult to cut and chewy rather than tender.
- Cool Completely Before Filling (If Baked): This is a critical step for baked crusts. If you fill a warm or even slightly warm crust, the residual heat can cause condensation, leading to a soggy bottom. Always allow your baked crust to cool completely on a wire rack before adding any wet filling.
- Create a Defined Edge: For an aesthetically pleasing crust, use your fingers to gently shape and compact the crumbs around the rim of the pie dish. You can create a simple, neat edge or use the tines of a fork to make a decorative pattern. This also helps prevent crumbling when serving.

How to Use Your Versatile Graham Cracker Crust
This homemade vegan graham cracker crust is the perfect foundation for an endless array of plant-based desserts. Its rich flavor and sturdy structure make it ideal for both baked and no-bake creations. Here are just a few ideas to inspire your next sweet masterpiece:
- Vegan Cheesecakes:
- Classic No-Bake Vegan Cheesecakes
- Fruity Cheesecakes (like Banana Cheesecake, berry, or mango)
- Decadent Chocolate Cheesecakes
- Vegan Cheesecake Bars
- Fruit Pies & Tarts:
- Crisp Vegan Apple Pie or Easy Vegan Cherry Pie
- Tropical Vegan Coconut Pineapple Pie
- Fresh Berry Tarts (strawberries, blueberries, raspberries)
- Lemon or Lime Meringue Pies (using aquafaba meringue)
- Creamy & Holiday Pies:
- Classic Easy Vegan Pumpkin Pie
- Rich Vegan Sweet Potato Pie
- Smooth Vegan Banana Cream Pie or Vegan Coconut Cream Pie
- Citrusy Delights:
- Tangy Easy Vegan Lemon Bars (with a crust bottom)
- Refreshing Easy Vegan Key Lime Pie
- Chocolate Lover’s Dreams:
- Rich Creamy Vegan Chocolate Pie
- Festive Silken Vegan Chocolate Peppermint Pie
- Peanut Butter Chocolate Pie
With this reliable and delicious graham cracker crust, your plant-based dessert possibilities are truly endless!
Storage Instructions for Your Graham Cracker Crust
One of the many benefits of this homemade graham cracker crust is its excellent storage capabilities, allowing you to prepare ahead and simplify your baking process. Proper storage ensures your crust remains fresh and ready for use.
How to Store an Unbaked Crust:
- Fridge: Once pressed into the pie pan, cover the crust tightly with plastic wrap to prevent it from drying out or absorbing odors from the fridge. It can be stored in the refrigerator for up to 4-5 days.
- Freezer: For longer storage, you can freeze the raw, pressed crust. Wrap it thoroughly with plastic wrap, then an additional layer of aluminum foil. It will keep well in the freezer for up to 3 months. When ready to use, thaw it in the fridge overnight before proceeding with your recipe.
How to Store a Baked Crust:
- Cool Completely First: If you’ve baked your crust, it is crucial to let it cool down completely to room temperature on a wire rack before chilling or storing. This prevents condensation, which can make the crust soggy.
- Room Temperature: A baked crust can be stored, covered loosely, at room temperature for 1-2 days, especially if it’s a dry climate.
- Fridge: For extended freshness, cover the cooled, baked crust tightly with plastic wrap and store it in the refrigerator for up to 4-5 days.
- Freezer: Similar to the unbaked crust, a fully cooled and baked crust can be frozen for up to 3 months. Wrap it securely in plastic wrap and then foil. Thaw in the fridge overnight before filling.
Properly stored, your homemade vegan graham cracker crust will be a convenient and delicious component for your next dessert creation!

Delicious Desserts to Pair with This Crust
This versatile graham cracker crust is the perfect base for a wide variety of delectable vegan desserts. Get inspired by these incredible recipes that beautifully complement its rich flavor and satisfying crunch:
Vegan Desserts
Mixed Berry Crumb Pie
Vegan Desserts
Easy Vegan Peach Pie with Crumble Topping
Vegan Desserts
Banana Cheesecake
Vegan Desserts
Creamy Vegan Chocolate Pie (4 Ingredients | Fuss-free!)
If you tried this Vegan Graham Cracker Crust recipe or any other recipe on my blog, please leave a 🌟 star rating and let me know how it went in the 📝 comments below. Thanks!
Homemade Vegan Graham Cracker Crust
15
0
15
1 pie crust
Print Recipe
Ingredients
-
13
whole vegan graham crackers (~1 ½ cups fine crumbs) -
½
cup
vegan butter
melted - Optional: 1-2 tablespoons granulated sugar or brown sugar
- Optional: ¼ teaspoon salt
- Optional: ½ teaspoon ground cinnamon
Instructions
-
Place the vegan graham crackers in a food processor and blend until they form fine, even crumbs. Alternatively, place them in a sturdy Ziplock bag and crush with a rolling pin until fine.
-
Transfer the crumbs to a mixing bowl. If using, whisk in any optional sugar, salt, or spices. Pour in the melted vegan butter. Stir until the mixture is fully combined and resembles wet sand.
-
Pour the mixture into a 9-inch pie dish (or your chosen pan size). Using the bottom of a flat glass or measuring cup, firmly press and flatten the crust evenly across the bottom and sides of the dish. Use your hands to help smooth and shape the sides for a clean edge.
-
The crust is now ready to be used as-is for no-bake recipes (chill in the freezer for 10-20 minutes or fridge for 30-45 minutes to set) or can be baked for 10-12 minutes at 350°F (175°C) until lightly golden. If baked, allow to cool completely before filling.
Notes
- Cracker amount may vary: Graham crackers differ in size/weight by brand. Always measure for 1 ½ cups of crumbs.
- Crush the crackers finely: Fine, even crumbs are essential for a smooth, cohesive crust.
- Pack the crust firmly: A compact crust holds better, but avoid overpacking to prevent a hard, dense texture.
- Cool before filling: If baked, let it completely cool before adding the filling to prevent a soggy crust.
- Flavor customization: Feel free to add 1-2 tbsp sugar, ¼ tsp salt, or ½-1 tsp cinnamon to the crumbs for extra flavor.
- Alternate cookies: Experiment with vegan gingersnaps, Oreos, or Biscoff for different flavor profiles. Adjust butter ratio as needed.
Nutrition Information (Estimated per serving)
Calories: 1430kcal | Carbohydrates: 139g | Protein: 13g | Fat: 91g | Saturated Fat: 22g | Polyunsaturated Fat: 21g | Monounsaturated Fat: 36g | Trans Fat: 0.5g | Sodium: 1929mg | Potassium: 354mg | Fiber: 6g | Sugar: 42g | Vitamin A: 4315IU | Calcium: 144mg | Iron: 8mg
(Nutrition information is an estimate and may vary based on specific ingredients and brands used.)
Additional Info
Toni Okamoto
Dessert
American
No cook (can be baked)
Vegan
Tried this recipe?
Please tag us at @PlantBasedOnABudget! We love seeing your delicious creations!