
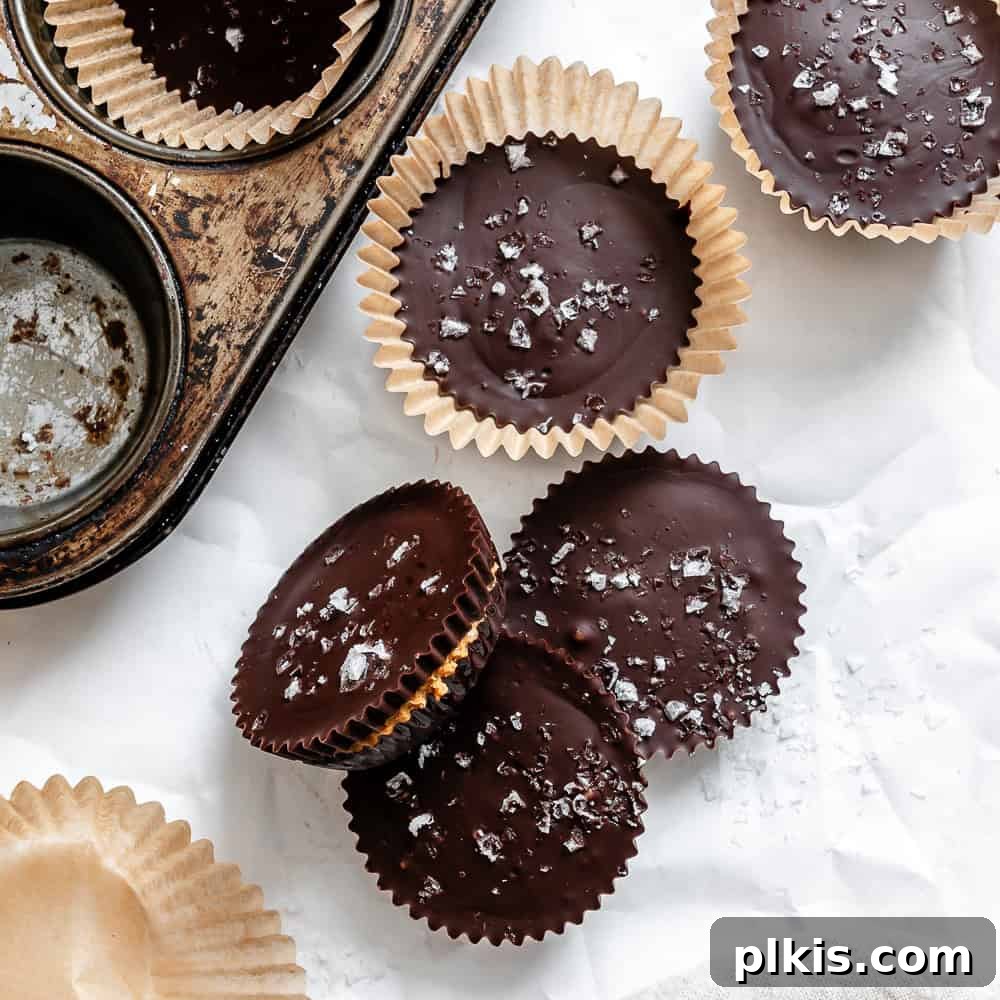
Easy 3-Ingredient Vegan Peanut Butter Cups: Your Guide to Homemade Bliss
Craving that classic combination of rich chocolate and creamy peanut butter? Look no further! This ultimate guide reveals how to effortlessly create delicious vegan peanut butter cups using just three simple ingredients. Forget the expensive, often hard-to-find store-bought versions; these homemade treats are not only incredibly easy and fun to make but also deliver a decadent, melt-in-your-mouth experience that rivals the original candy. Perfect for satisfying any sweet tooth, these plant-based delights are about to become your new go-to dessert.

Why You’ll Absolutely Love This Recipe
When it comes to sweet treats, convenience, cost-effectiveness, and deliciousness are key. This vegan peanut butter cups recipe ticks all those boxes and more. Here’s why these homemade delights will quickly become a favorite in your kitchen:
- **Effortlessly Simple & Pantry-Friendly:** Say goodbye to complex baking projects! With only three core ingredients—vegan chocolate chips, peanut butter, and a touch of salt—this recipe is incredibly straightforward. Most of these items are likely already in your pantry, making it easy to whip up a batch whenever a craving strikes.
- **Superior Taste & Texture:** Unlike many store-bought vegan alternatives that can sometimes compromise on flavor or texture, these homemade cups are every bit as creamy and indulgent as their traditional counterparts. The balance of rich chocolate and smooth, nutty peanut butter is simply divine.
- **Endlessly Customizable:** This recipe is a fantastic blank canvas for your culinary creativity. Explore a myriad of variations by experimenting with different nut or seed butters, various types of vegan chocolate (dark, milk, white), and a host of flavorful add-ins. From crunchy textures to fruity bursts, the possibilities are limitless.
- **Budget-Friendly Indulgence:** Buying specialty vegan candies can be expensive. Making them at home drastically cuts down on costs, allowing you to enjoy a gourmet-quality treat without breaking the bank.
- **Perfect for All Occasions:** Whether you need a quick child-friendly freezer snack, a delightful addition to holiday celebrations like Valentine’s or Halloween, or simply a convenient meal-prep treat for the week, these peanut butter cups fit the bill. They’re also ideal for gifting!
- **Dietary-Friendly & Wholesome Control:** As a vegan recipe, it’s naturally dairy-free and egg-free. By making them yourself, you have complete control over the quality of ingredients, allowing you to choose organic, refined-sugar-free, or specific allergen-friendly options to suit your preferences and dietary needs.
If you enjoy simple, delicious, and plant-based desserts, you might also love these recipes: peanut butter and chocolate bark, chocolate covered trail mix peanut butter balls, 3-ingredient chocolate coconut balls, chocolate peanut butter protein popsicles, or edible peanut butter cookie dough.
Gathering Your Simple Ingredients
The beauty of these vegan peanut butter cups lies in their minimal ingredient list. You’ll be amazed at how such simple components can create such a luxurious treat. Beyond the core three, you’ll also need some basic kitchen equipment.

Essential Components:
- Vegan Semi-Sweet Chocolate Chips: The quality of your chocolate will significantly impact the final taste. Opt for a brand you love that melts smoothly. Semi-sweet is a popular choice for a balanced flavor, but dark vegan chocolate (70%+ cocoa) can provide a richer, less sweet profile, while vegan milk chocolate offers a creamier, sweeter result.
- Creamy Peanut Butter: The heart of your peanut butter cups! A smooth, creamy peanut butter works best for an even filling. If using natural peanut butter, ensure it’s well-stirred to prevent separation. For a thicker filling, refer to the FAQ section.
- Flaky or Regular Salt: A pinch of salt is crucial for enhancing the flavors and balancing the sweetness of the chocolate and peanut butter. If your peanut butter is already salted, you might adjust the amount added to the filling, and definitely consider a final sprinkle of flaky sea salt for an elevated gourmet touch.
Necessary Equipment:
While the ingredients are few, having the right tools makes the process even smoother:
- Muffin Tin: A standard 12-cup muffin tin is perfect for shaping your peanut butter cups.
- Parchment Paper or Silicone Muffin Liners: These are essential for easy removal of the finished cups and maintaining their shape. Silicone liners are reusable and environmentally friendly.
- Microwave-Safe Bowl or Double Boiler: For melting your vegan chocolate efficiently.
- Measuring Cups and Spoons: For accurate ingredient proportions.
- Spatula or Spoon: For stirring chocolate and spooning peanut butter.
- Piping Bag or Ziplock Bag (Optional but Recommended): This helps create neater, more professional-looking chocolate layers, especially for covering the peanut butter filling.
Unleash Your Creativity: Exciting Recipe Variations
One of the most exciting aspects of this recipe is its adaptability. Once you master the basic 3-ingredient version, you can start experimenting with a myriad of variations to create unique flavor combinations and textures. Here are some ideas to spark your culinary imagination:
- Sweetener Swaps: While the chocolate and peanut butter provide plenty of sweetness, you can adjust the sweetness of the peanut butter filling. Stir in a touch of maple syrup, agave nectar, or powdered sugar for added sweetness. For a sugar-free option, use erythritol or another powdered sugar substitute.
- Fruity Twists:
- PB&J Inspiration: Add a thin layer of your favorite jam or jelly (grape, raspberry, or strawberry) directly under the peanut butter for a delightful PB&J cup.
- Fresh Fruit Burst: Embed a small raspberry or a few blueberries into the peanut butter filling before adding the top chocolate layer. The tartness of the fruit beautifully complements the rich chocolate and peanut butter.
- Aromatic Additions:
- Vanilla Infusion: A dash of vanilla extract mixed into the peanut butter filling can elevate its flavor profile, adding a warm, inviting aroma.
- Coffee Kick: For mocha lovers, add a teaspoon of instant coffee or espresso powder to the melted vegan chocolate. This creates a sophisticated, coffee-infused chocolate shell. If you adore coffee-flavored treats, don’t miss out on this vegan coffee cake or easy coffee cupcakes.
- Spice it Up:
- Warm Spices: Incorporate spices like cinnamon or pumpkin pie spice into the peanut butter for a cozy, autumnal twist.
- Flavored Peanut Butter: Save a step by using a store-bought flavored peanut butter, such as cinnamon swirl or chocolate peanut butter.
- Crunch Factor: Introduce an exciting textural contrast by adding crunchy elements to the filling or sprinkled on top of the chocolate.
- Salty Crunch: Crushed pretzels or a sprinkle of flaky sea salt (beyond the initial pinch) offer a delightful sweet and salty experience.
- Cookie Crumble: Finely crushed vegan cookies like Oreos, graham crackers, or Biscoff biscuits can be mixed into the peanut butter or scattered over the chocolate.
- Nutty & Seedy: Chopped peanuts, cashews, almonds, or seeds (like pumpkin or sunflower) add a natural crunch.
- Crispy Treats: Puffed rice cereal or shredded coconut can be folded into the peanut butter for a lighter, crispy texture.
- Nut Butter Alternatives: Not a fan of peanut butter or have an allergy? No problem! This recipe works beautifully with other nut or seed butters.
- Nutty Alternatives: Try almond butter, hazelnut butter, or cashew butter for different flavor profiles. Each offers a unique richness.
- Nut-Free Options: For a completely nut-free version, sunflower seed butter or granola butter are excellent substitutes, ensuring everyone can enjoy this treat.
- Protein Power-Up: For a more substantial snack, transform these into protein peanut butter cups by adding a scoop of plain or vanilla vegan protein powder to the peanut butter filling. If the mixture becomes too thick, simply thin it out with a little maple syrup or plant-based milk until it reaches your desired consistency.
Step-by-Step Guide: How to Make Vegan Peanut Butter Cups
Creating your own vegan peanut butter cups is a straightforward and enjoyable process. Follow these detailed steps to achieve perfect, homemade treats every time.


Step 1: Prepare Your Liners and Melt First Chocolate Layer
Begin by lining a 12-cup muffin tin with your chosen parchment or silicone muffin liners. Once lined, place the entire muffin tin into the freezer. This pre-chilling step helps the chocolate set faster and prevents the liners from sticking. Next, take 8 ounces of your vegan chocolate chips and place them in a microwave-safe bowl. Melt the chocolate in 30-35 second intervals, stirring thoroughly between each interval. Continue until the chocolate is smooth and completely melted, being careful not to overheat it, which can cause burning or seizing. Alternatively, you can use a double boiler for a gentler melting process.
Step 2: Create the Chocolate Base
Remove the pre-chilled muffin tin from the freezer. Spoon approximately one tablespoon of the melted vegan chocolate into the bottom of each liner. Gently tap the muffin tray on your countertop a few times to help the chocolate self-level and create an even base. This ensures a uniform thickness for your peanut butter cups. Return the tray to the freezer for about 5 minutes, allowing this first layer to set firm.


Step 3: Add the Creamy Peanut Butter Filling
Retrieve the muffin tray from the freezer once the chocolate base is solid. Spoon or pipe approximately one teaspoon of peanut butter into the center of each chocolate base. Using the back of a spoon or a small knife, gently flatten the peanut butter into an even layer. Crucially, leave a small margin around the edges of the peanut butter layer, ensuring it doesn’t touch the chocolate liner. This allows the final chocolate layer to completely encapsulate the peanut butter, creating that classic peanut butter cup look and preventing leakage. If your peanut butter is particularly runny, it might naturally spread to cover the entire surface, which is perfectly acceptable for layered cups.
Step 4: Melt and Apply the Top Chocolate Layer
Melt the remaining 8 ounces of vegan chocolate chips. For this batch, aim for a slightly thicker consistency. Heat it until it’s *mostly* melted, with a few small chunks remaining. Then, stir vigorously; the residual heat from the melted chocolate will melt the remaining chunks, ensuring a smooth yet slightly thicker chocolate that sets well. This technique helps prevent the top layer from being too thin. Transfer the melted chocolate to a piping bag (with a small opening cut at the tip) or a Ziplock bag with a corner snipped off. Carefully pipe the melted chocolate around the edges of each peanut butter layer first, ensuring it connects with the bottom chocolate base. This creates a seal. Then, pipe more chocolate over the top to completely cover and encapsulate the peanut butter. Ensure an even coating for each cup.
If using very runny peanut butter, it may naturally spread to cover the entire surface rather than forming a distinct mound. This is completely fine and will still result in delicious cups!

Step 5: Final Chill and Enjoy!
Once all cups are topped with chocolate, gently tap the muffin tray on your counter again. This helps to level the top chocolate layer and remove any air bubbles, creating a smooth, attractive finish. Immediately sprinkle a touch of flaky sea salt over the top of each cup, if desired, for a gourmet touch that enhances the flavor. Transfer the tray back to the freezer for at least one hour, or until the peanut butter cups are completely set and firm. Once solid, carefully remove them from their liners. If the chocolate hardens unevenly or has a dull finish, you can briefly (5-10 seconds) place the tray under a preheated broiler before chilling to create a glossy top layer. For more detailed tips on melting chocolate perfectly, refer to our comprehensive guide on how to melt chocolate.
Now, they are ready to be enjoyed! These treats are best served cold straight from the fridge or freezer.
Frequently Asked Questions About Vegan Peanut Butter Cups
Can I make a nut-free version of these peanut butter cups?
Absolutely! If you have a nut allergy or simply prefer an alternative, you can easily substitute peanut butter with sunflower seed butter (like SunButter) or granola butter. These alternatives offer a similar creamy texture and nutty flavor profile, ensuring a delicious and safe treat for everyone.
Can I use natural peanut butter for this recipe?
Yes, natural peanut butter can certainly be used. However, because natural peanut butter tends to be runnier than processed varieties, it works best for a “layered” cup where the peanut butter forms a distinct layer rather than being fully encapsulated. If you prefer a thicker, more solid filling that holds its shape better, especially for encapsulation, you can thicken your natural peanut butter. Methods include adding powdered sugar (or erythritol for a sugar-free option), finely crushed vegan graham crackers or Biscoff biscuits, peanut butter powder, almond flour, or a scoop of vegan protein powder. Start with small amounts and mix until you reach your desired consistency.
Is it possible to make mini peanut butter cups?
Indeed! Mini peanut butter cups are a fantastic option for bite-sized treats or party favors. Simply use mini cupcake liners and adjust the ingredient quantities accordingly (e.g., about half a tablespoon of chocolate for the base and top, and half a teaspoon of peanut butter for the filling). The chilling times might also be slightly shorter for mini versions.
Are these considered healthy peanut butter cups?
The “healthiness” of these peanut butter cups depends largely on your ingredient choices. For the healthiest version, we recommend making homemade vegan dark chocolate peanut butter cups. Opt for rich dark chocolate (with a cocoa content of 70-75% or higher, which typically has less added sugar and more antioxidants) and a natural peanut butter with no added oils, sugars, or preservatives. While still an indulgence, choosing high-quality, minimally processed ingredients allows you to enjoy a treat that offers more nutritional benefits compared to heavily processed store-bought candies.
What kind of vegan chocolate should I use?
The type of vegan chocolate you choose can greatly influence the flavor and texture. Vegan semi-sweet chocolate chips are a popular and versatile choice. For a richer, more intense flavor, opt for vegan dark chocolate (70% cocoa or higher). If you prefer a sweeter, creamier profile, look for vegan milk chocolate alternatives. Ensure the chocolate is clearly labeled “vegan” or “dairy-free,” as some dark chocolates may still contain milk products due to cross-contamination or hidden ingredients.
Can I make these gluten-free?
Yes, these vegan peanut butter cups are inherently gluten-free, provided you use gluten-free vegan chocolate chips and peanut butter without any gluten-containing additives. Always check ingredient labels to confirm, especially if adding any mix-ins like crushed cookies.
What is the best way to store homemade vegan peanut butter cups?
Proper storage is key to maintaining freshness and texture. They can be stored in an airtight container in the refrigerator for up to 1 month, or in the freezer for up to 4 months. Always allow frozen cups to thaw for 10-15 minutes at room temperature before enjoying for the best texture.
Pro Recipe Tips for Perfect Vegan Peanut Butter Cups
Achieving bakery-quality vegan peanut butter cups at home is easy with a few expert tips. These suggestions will help you overcome common challenges and ensure your treats are nothing short of perfect:
- Invest in High-Quality Vegan Chocolate: The flavor of your chocolate is paramount. Choose a rich, semi-sweet or dark vegan chocolate that you genuinely enjoy eating on its own. Higher quality chocolate melts more smoothly and sets with a better snap and gloss, significantly elevating the final taste of your peanut butter cups.
- Don’t Skip the Salt: If you’re using unsalted peanut butter, adding a small pinch of flaky or regular salt directly into the peanut butter filling is a game-changer. Salt acts as a flavor enhancer, balancing the sweetness of the chocolate and bringing out the nutty depth of the peanut butter. A final sprinkle of flaky sea salt on top before chilling adds a delightful sweet-and-salty contrast.
- Work Efficiently and Quickly: Vegan chocolate, especially without added coconut oil, tends to firm up quite rapidly once melted. To ensure smooth layers and an easy assembly process, have all your ingredients measured and your workstation ready *before* you start melting the chocolate. Move quickly through the layering steps to avoid the chocolate setting prematurely.
- Chill Between Layers – It’s Essential!: This step is non-negotiable for beautifully distinct layers. Chilling the bottom chocolate layer until firm before adding the peanut butter, and then chilling again before the final chocolate layer, prevents the peanut butter from sinking into the warm chocolate. This results in cleaner, more even layers and a professional finish. Aim for about 5-10 minutes of chilling per layer until solid to the touch.
- Precision in Peanut Butter Placement: When adding the peanut butter, ensure it’s centered and leaves a small gap around the edges of the chocolate base. This allows the top chocolate layer to fully encapsulate the peanut butter, creating a sealed cup and preventing the filling from oozing out when you bite into it.
- Proper Chocolate Melting Technique: Whether using a microwave or a double boiler, avoid overheating the chocolate. Overheated chocolate can become grainy, seize, or burn. Melt in short bursts, stirring continuously until just smooth. For the top layer, melting it until mostly smooth and then letting residual heat finish the job with stirring can help achieve a slightly thicker consistency ideal for topping.

Storage Instructions for Freshness
Once your delectable vegan peanut butter cups are set, proper storage is key to maintaining their freshness, texture, and flavor. They are incredibly stable and can be kept in two ways:
- Refrigerator: For everyday enjoyment, store your vegan peanut butter cups in an airtight container in the refrigerator. They will remain fresh and delicious for up to 1 month. The cool temperature helps keep the chocolate firm and prevents the peanut butter from becoming too soft.
- Freezer: For longer-term storage or to always have a sweet treat on hand, freeze your peanut butter cups. Place them in an airtight freezer-safe container, separating layers with parchment paper if necessary to prevent sticking. They will keep well in the freezer for up to 4 months. When you’re ready to enjoy a frozen cup, simply remove it from the freezer and allow it to thaw for 10-15 minutes at room temperature before biting in. This slightly softens the chocolate and peanut butter to their ideal texture.
Always ensure they are stored in an airtight container to prevent them from absorbing odors from other foods in your fridge or freezer, which can compromise their delicious taste.

Other Peanut Butter Recipes to Consider
If you’ve fallen in love with the combination of chocolate and peanut butter, or simply can’t get enough of this versatile legume, here are some other fantastic plant-based recipes featuring peanut butter that you might enjoy exploring:
Vegan Desserts
Peanut Butter Chocolate Bark
An incredibly easy and customizable chocolate bark with swirls of peanut butter, perfect for a quick sweet treat.
Vegan Desserts
No-Bake Peanut Butter Cups
A variation of the classic, these no-bake cups offer a slightly different texture and often incorporate more wholesome ingredients.
Vegan Desserts
Chocolate Covered Peanut Butter Balls (+ Add-Ins)
These delightful balls combine the richness of peanut butter with crunchy trail mix ingredients, all enveloped in chocolate.
Vegan Breakfasts
Peanut Butter Granola Bars
A wholesome and energizing snack or breakfast option, packed with the goodness of oats and creamy peanut butter.
If you tried this vegan peanut butter cups recipe or any other recipe on my blog, please leave a ⭐ star rating and let me know how it went in the 📝 comments below. Your feedback is greatly appreciated!
Vegan Peanut Butter Cups Recipe
Prep Time: 15 mins
Total Time: 1 hr 15 mins
Servings: 12 servings
Print Recipe
These 3-ingredient homemade vegan peanut butter cups are easy, fun to make, and every bit as creamy and indulgent as the original candy – perfect for a sweet tooth!
Equipment
- Measuring Cups
- Measuring spoons
- Muffin Tin
- Parchment or Silicone Muffin Liners
- Microwave-Safe Bowl or Double Boiler
- Spatula or Spoon
- Piping Bag (optional)
Ingredients
- 16 ounces of vegan semi-sweet chocolate chips (divided into 8 oz for base, 8 oz for top)
- 1 cup of creamy peanut butter
- ½ teaspoon of flaky or regular salt (if using unsalted peanut butter, plus more for garnish)
Instructions
- Line a muffin tin with 12 parchment paper or silicone liners. Place the muffin tin in the freezer to chill.
- Add 8 ounces of vegan chocolate chips to a microwave-safe bowl. Microwave in 30-35 second increments, stirring well after each, until completely melted and smooth. Be careful not to overheat.
- Remove the chilled muffin tin from the freezer. Add 1 tablespoon of melted vegan chocolate to each liner. Gently tap the tray on the table to level the chocolate, then freeze for 5 minutes until set.
- While the chocolate base chills, prepare your peanut butter, measuring spoon, and a small knife. Also, prepare a piping bag or Ziplock bag with a small opening cut at the tip.
- Melt the remaining 8 ounces of vegan chocolate chips in the same bowl. Microwave until most of the chocolate is melted but a few chunks remain. Stir continuously until the residual heat melts the remaining chunks, creating a slightly thicker consistency. Do not over-melt.
- Take the muffin tray out of the freezer. Ensure the chocolate base is solid.
- Place 1 teaspoon of peanut butter into the center of each cup, using the knife to help remove it from the spoon. Flatten the peanut butter into an even layer, leaving the edges clear for the chocolate to encapsulate. (If using runny peanut butter, it will naturally spread.)
- Give the second batch of melted vegan chocolate a final good mix, then transfer it into the prepared piping bag.
- Pipe vegan chocolate around the edges of each peanut butter layer, ensuring it connects with the bottom chocolate layer. Do not cover the top yet.
- Once all cups have chocolate around the peanut butter, pipe more vegan chocolate on top to completely cover and encapsulate the peanut butter filling.
- Gently tap the tray on your counter to help the chocolate self-level. If the chocolate has hardened too much, briefly place the tray in a conventional oven on broil for 5-10 seconds to soften the top layer before tapping again.
- Sprinkle some flaky salt over the tops of the cups, if desired.
- Place the muffin tray back into the freezer for at least 1 hour, or until the peanut butter cups are fully set and firm.
- Remove from the freezer, carefully peel off the liners, and enjoy cold!
- Store any leftover vegan peanut butter cups in an airtight container in the freezer for later use.
Notes
- Use high-quality vegan chocolate: The better the chocolate, the better the final taste and texture.
- For enhanced flavor: If your peanut butter is unsalted, a pinch of salt is vital to balance and deepen the flavor.
- Work quickly: Melted vegan chocolate sets fast, so have all components ready and assemble without delay.
- Chill between layers: This crucial step prevents the peanut butter from sinking and ensures distinct, even layers.
Nutrition Facts (per serving)
(Based on 12 servings)
- Calories: 318 kcal
- Carbohydrates: 28g
- Protein: 7g
- Fat: 24g
- Saturated Fat: 10g
- Polyunsaturated Fat: 3g
- Monounsaturated Fat: 5g
- Sodium: 189mg
- Potassium: 121mg
- Fiber: 4g
- Sugar: 20g
- Calcium: 60mg
- Iron: 3mg
Additional Information
- Author: Toni Okamoto
- Course: Dessert, Snack
- Cuisine: American
- Method: Microwave
- Diet: Vegan
Tried this recipe? Please tag us at @PlantBasedOnABudget! 😊